Monday, November 29, 2010

First Look Ronsonic Diesel Driver

Here's the big, bad buffer. The Ronsonic Diesel Driver. Plug 9 - 18VDC into the jack at the top and your guitar into the jack you see on the side there.


The input impedance is matched to that of classic guitar amps. This will not load down your guitar. It also won't give it that unpleasant brittle, glassy top end that some buffers with extremely high input impedances do.

The goal here was transparency, as if nothing was added to your guitar and nothing taken away.

Then you go around to this side:

The top jack goes out to your tuner. It has its own buffer so nothing that happens there can affect your signal. Some tuners are infamous tone-hogs that will kill signal even off on a side chain. That won't happen here.

The next jack is the Send to your pedal board. This is buffered with a state-of-the-art opamp that can drive any load that will be encountered in the wild. Prototypes were built with more usual opamps that sounded good but didn't have these spec's, now we are way ahead of the bunch with great sound and impeccable technical spec's.

The third jack down is the Return from your board.

The bottom jack goes to your amp. Again this is seriously buffered and fully capable of driving huge runs of cable without signal loss. For large stages and ever more common isolation boxes this will get your signal to the amp intact and sounding great.

The switch can either bypass your pedalboard or work as a mute, silencing everything except the tuner out. Choose this option when you order. It can be changed with a simple soldered in jumper by any reasonably competent tech should you change your mind later. If you prefer, a user selectable jumper can be added at a slight extra charge. We don't recommend this as this should be a more or less permanent decision and even with the gold plated connectors we prefer the reliability of soldered connections.

Legends are hand marked on the bottom since we don't anticipate this being plugged and unplugged a lot. Mostly this will get installed on the board and forgotten except to step on it when it's time to tune. You can order top markings if you prefer in legible technician hand lettering.

We are taking orders now, no payment until we are ready to ship in 2-4 weeks. Price is $129 plus $8 flat rate shipping in the USofA.

Please email if you are interested in getting a free test run with the prototype.

Tuesday, October 26, 2010

Hero / Guru Pedal

Just got some photos in of a current Hero/Guru dual pedal.


Pretty huh?

Here's the gut shot. Because it should be pretty on the inside too.

Monday, October 11, 2010

Time for an Update.

Wow, way overdue for an update. The big action around here is still the development of the Diesel Driver Buffer. That's right my obsessive compulsive pursuit of the ultimate guitar buffer pedal/system continues. Prototypes have been built and electronically they are almost there. I'm still auditioning driver IC's, it works well and sounds excellent with a very common type, but I'm still looking for a high performance driver that is as smooth and uncolored.

One Diesel Driver has made it into a customer's hands and is now in service after being auditioned against a CAE buffer.

The first prototype circuit boards answered all the questions they were supposed to. Now I've ordered samples of what I hope and expect will be the final design. I'm hoping to have a Tour Box going out before Halloween. So if you're interested in trying this bad boy out, hit the email button and let me know.

Other business proceeds apace. Still doing repairs and finding time to play guitar again.

Stay well and healthy. Be back with more soon.

Monday, September 6, 2010

Been Busy

Been busy building and prototyping pedals and revising and updating the PCBs. Progress is sweet but slow.

In the meanwhile, go enjoy some FX pedal history. There you'll find the history of Fuzz as seen from the Country music perspective. Lots of great links to musical samples and examples.

GO! Now!

Monday, August 16, 2010

The Boards Have Landed

The prototypes of the new PCBs for the Ronsonic Diesel Drive Buffer have arrived. They look good, very good. I'm building them up now and am already planning improvements for the production version.

It's funny you look at a schematic on the screen for months, study and craft the circuit board on screen and on paper for weeks and then you get the thing in your hands and improvements become obvious. The good news is that there are no errors to correct, only improvements in layout and assembly.

The Electric Guru and Hero boards are also in. These are a lot nicer than the original builds. I'll be assembling a couple of single and dual pedals to go off in a couple of Tour Boxes I'm planning. So be ready for the announcement.

The next couple of posts will discuss some of these pedals in a general way, the various types of buffers, history and use of treble boosters and like that. So stay tuned for some pedal geek goodness.

Thursday, July 29, 2010

New Circuit Boards On The Way

Big news on several projects.

The big project for the last couple of months has been preparing the new Diesel Drive Buffer for production. This is the monster buffer project that I described previously. The original target price of $100 is now deemed hopeless, too many compromises would be necessary to get there. It would still be a better than typical product, but why do "better" when "awesome" is within reach. This does not use your usual twelve cent transistors or fifty cent ICs; it is all top shelf parts all the way. And this is an application that will reward the investment.

The order has been placed with the board house for prototypes of the new circuit board. They will be here in a couple of weeks and we'll get this thing off the breadboard and onto the pedalboard for some serious workouts. It's very hard to demonstrate a buffer pedal in a recording of video, but I've got a few ideas about how to show what this beast can do.

I am also revisiting a couple of classics. The Hero Overdrive and Electric Guru Treble Booster are also getting new circuit board designs. These boards will both speed production and produce a more reliable pedal. None of the existing pedals have had any circuit related failures, but these will just be that much more robust.

Thanks for checking in, I'll keep you posted on any new developments.

Hero Pedal with Down By Law - LIVE.


That last video was sweet. Now back to what we normally do around here. Rock out.


That was Sam with Down by Law in Brazil. Yeah, the video is a bit crude, but whaddya want, it still rocks.

Monday, July 19, 2010

Daily Diversion


I know little about Jewel or her music. But what I see in this video, I like. She's a good sport and that's a great crowd.

Saturday, July 17, 2010

More Dirt Removal


So, we've talked about preventing problems by exercising all the controls and jacks. We've turned all the knobs and flipped all the switches and run a plug in and out of all the jacks. So anything still not working right needs more than just exercise. Almost everything here applies to pedals and guitar electronics as well as to amps.

Mostly we're going to approach this from the point of view of solving a problem. You may not need to address everything discussed here. If you've got a noisy switch or a jack that hums when nothing is plugged in you might not want to do the whole amp, especially if it is otherwise clean and in good shape. But if you've got something that's been left in a shed or has a lot of obscure noises, get it all.

Let me introduce my favorite product in the world. Caig Deoxit D5.


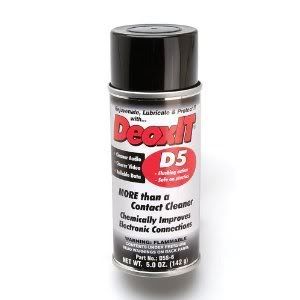
You need a can of this. It isn't cheap, $12 - 18 for the size shown but it will last a long time and do a tremendous amount of good while it lasts. There are other worthwhile contact cleaners, but as long as I've been using this I haven't needed another. The one thing that does not work is WD40. Save that for cleaning bike parts and keeping your tools from rusting. WD40 leaves a lot of oil behind that dries into a hard and unpleasant varnish. If you use it on something you will need to use it again because of it. Then you'll need something else to flush out all the old WD40.

One other reason to use D5, it is completely benign to tolex, plastic, guitar finishes (even nitrocellulose lacquer) and, so far as I can tell, human beings. Don't drink the stuff, but I have gotten it in my eye and even that doesn't burn. Here's the MSDS.

So get your can of D5 and some tools if that is where this next phase takes us. Notice that the nozzle turns to adjust the spray, you'll want that at the lowest setting.

Tube Sockets and Grotty Tube Pins

For tube sockets, give a small small spray either directly at the socket or on the tube pins and run the tube in and out of the socket. Allow to dry before firing up the amp. Some tube pins tend to corrode in really ugly ways. The pins on small 9 pin tubes, like 12AX7s require some very fancy metallurgy. Because they go through the glass they have to expand and contract with heat in a way that is compatible with the glass. Normal metals won't do this, so corrosion resistant alloys are out of the question. Use a shot of Deoxit and a bit of 3M scotch brite to clean heavy corrosion. Sandpaper also works. Never use a file on a tube pin it, the vibrations will damage the tube.

We test for dirty pins by firing up the amp and listening while pushing the tube around a little in the socket. Start with the controls set low, no reason to blast yourself. If there's a problem it will be obvious. So, clean, let dry, power up and test. Just put a finger tip on the top of the tube and move it gently. If one cleaning does not do the job, repeat it.

Control Pots

We need access to the controls for this. It is rarely rewarding to try to clean a pot by spraying around the shaft and hoping the cleaner gets in. It's worth a try as a desperation move on a sealed pot, but not normally worth it. So open up the amp. All the normal safety warnings apply. Unplug and use a DC voltmeter to ensure that the voltages in the amp have drained. If you don't understand that, do not proceed.

With the amp open, look at the pot in the area where the terminals come out to be soldered to the wires or to the circuit board. Generally there will be window in the metal can around the terminals. Some pots will also have a hole in the case.


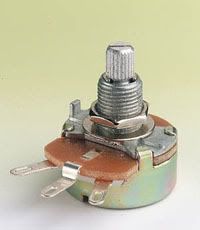
A short spray into either of these openings followed by exercising the pot will do the job. These do not get hot so you can feel free to test immediately. Do be sure the amp is correctly connected and safe before applying power. The usual rule is that a pot that does not operate cleanly after two cleaning attempts should be replaced. Do know that some controls will always be a little noisy, the "Presence" control on Marshalls is one example. Some pedals will also misbehave like that.

As a general rule any pot with DC current flowing through it will make noise. This can be an important diagnostic tool. If you find a pot that is noisy when turned that does not improve with cleaning and you notice that the noisy spots in the pots rotation never move when you spray or exercise it you likely have a DC voltage on that pot. This can help locate a leaky coupling capacitor or failing opamp.

Jacks

A quick spritz of Deoxit into the jack an running a plug in and out will solve most jack problems. Including dirt on the shorting leaf of the input jacks on an amp. This is the introductory course so we won't talk about the use of a burnishing tool for the ones that don't respond. Again, if repeated cleaning attempts fail, it is probably best to replace the jack.

Everything Else

In most modern amps you are going to find connectors like this:
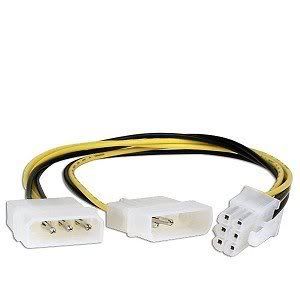
And this.


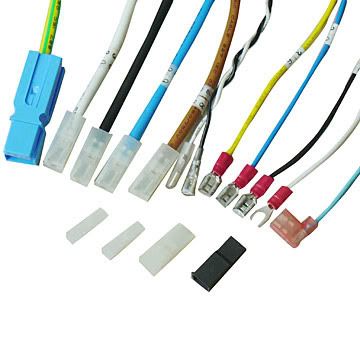
You'll find these push on connectors throughout many amps and almost always connecting speakers. It is good practice to clean them every few years, especially if you've got noise problems. Give the connector a short spray of D5 before removing it, this will make it a lot easier if there is any corrosion already there. Pull and push it back down a couple of times. On some amps, this could keep you busy awhile.

Be careful of any connectors that aren't indexed. Make sure everything goes back just as it was. Some multi-pin connectors will have a latch or catch on them. Don't just yank - look.

This is also where you will find if a connector has been poorly soldered. If the pin or post comes out of the circuit board, it isn't because you did something wrong, it is because it already had a problem.

Switches

I do not recommend cleaning a malfunctioning power or standby switch. Once those have gone the least bit bad, they arc and destroy the contacts in a way that no cleaner will fix. It may not hurt to clean a functional switch, but remember that Deoxit is flammable and we do not want any fires in the amp. You'll find that most such switches are sealed anyway.

Signal switches are another matter entirely. Find an opening. Sometimes the only path into the switch is straight along the actuator shaft, usually with a spring in your way. Even those often have a small cutout on the top. You'll see if you've gotten in there. It doesn't take much. One of the important things to know about Deoxit is that the less you use the better.

The Important Trick

Using heat from a lighter or other source you can soften the spray tube and bend it into a convenient shape. Don't melt it, and don't do this on the can. Let me emphasize that do not spray Deoxit near a heat source or flame. Bend the straw then mount it to the can. The bent straw will get in a lot more places than the straight one.

The Short Version
Find all the connections in the amp, give them a shot of Deoxit and move them through their range of motion. Let dry and add power.

Congratulations. You should now have a quieter, sweeter sounding amp.

Tuesday, July 6, 2010

My Thought for the Day


Price Point Engineering is the art, the craft and the science that serves marketing by ensuring that no customer buying a product ever gets more than he paid for.

Saturday, July 3, 2010

Dirt Sounds Like Dirt


Dirt sounds bad. It doesn't even sound good in a bad / good dirty way. So let's talk about how to get the crud out of your amp. I intend for this to be the first of a series of posts on things a player can do to understand, maintain and improve his own equipment. Not that I don't want the work, you can always just send it to me or one of my colleagues around the country. We're always happy to do this stuff. Even if you do just send it in, now you'll know what we're doing and why, and why we charge what we do for it.

What is this crap and where did it come from?

Open up any well used guitar or bass amp and you'll usually be greeted by something far dirtier than its external appearance and conditions of use would have you believe. The short answer is that large positive voltages attract crap from the air. Notice how quickly dust finds its way to your TV or computer monitor, like that but slower because of the lower voltages. It isn't uncommon to look in something like an Ampeg SVT and see a trail of filth on the circuit board that outlines the path of the copper traces on the other side of the board.

Fans (like in that SVT) are a part of that. Along with the cooling air, they blow in all the contaminants and dust in that air. Ever play a bar that served food? The airborne grease from the deep fryer has found its way onto and into your amp. If you can smell something, food, cigarette smoke, stage fog it can end up in your amp.

Crud and filth also get into an amp through more obvious methods. At the end of a show, what do you do? Unplug the guitar, wipe it down and put it away (you do wipe it down, right), then you go to the amp, turn it off and start wrapping your cords. While you're standing there winding your cable watch the plug drag across the stage picking up spilled beer, bassist sweat, punk singer spit and just plain crap tracked in from the parking lot when you loaded in. That filthy plug will go back into your guitar or amp the next time you play and it will foul the jacks. (Guinness will totally mess up a plug, that's experience talkin')

Oh, and metal just plain tarnishes when you leave it alone in Earth's atmosphere. There are metal on metal connections from one end of your amp to the other, switch and jack contacts, wipers on control pots, every sort of Faston, Molex and pin connector known to man. Unless they're all gold plated, and they're not, they will tarnish or corrode. Oh, even the gold ones pick up crud same as everything else.

So what's so bad about this crud?

Some of this crud acts as an insulator that prevents signal from passing; some forms of crud, especially some of the corrosion found on contacts acts as a semiconductor. I've seen tarnished FX loop jacks that acted like a diode distortion circuit. How does that happen? Many jacks in guitar amps do more than just connect to the cable that you plug in. The input jacks almost always have some sort of switching contact that shorts the input to ground when nothing is plugged in. This is to quiet the amp when you aren't using it. When that shorting contact gets dirty the amp will tend to buzz or pick up radio stations when nothing is plugged into it. That wouldn't be so bad on an amp with only one input jack, but most amps have more and we don't use them all. So the unused jack is sitting there introducing noise and static while you're playing into the other.

Some amps have an FX loop or a set of jacks labeled "preamp out" "power amp in." Those are called looping jacks and have a set of switch contacts built in that bypass the jack when nothing is plugged in. When those tarnish or get dirty, the amp cuts out or distorts in really bad ways. If you have an amp that is cutting out that has any sort of looping jack the first thing to test is to plug a short cable between the in/out or send/return jacks and see if that fixes the symptom. Practice amps that have a "Headphone" jack can also suffer from this type of problem since the headphone jack is usually designed to kill the signal to the speaker.

What can I do about it?

There are two answers, one is preventative the other remedial. The most important preventative is exercise, that is use all of the jacks and controls on your amp. The guys who design the components are pretty smart and most switching contacts are what is called "self-wiping" which leaving out all potty references means they rub against one another when you use them abrading away tarnish and crud. At least once or twice a year make sure to exercise every switch, knob, control and jack. With the power off, flip every switch back and forth about ten times, especially the ones you never use. You shouldn't need to worry about the power and standby switches, but all those channels and stuff you don't use, exercise those switches. Turn every control pot back and forth about ten times, especially the ones you haven't touched since you got it. For those you can have the amp powered up with the master volume set sorta low and listen to see if they're noisy and if they clean up. For the jacks, again more exercise, run a plug in and out of each one about ten times. Don't feel awkward if you get a little excited doing this, it's only natural. And I do mean every jack, speaker jacks (with the power off, of course) FX loops, footswitch jacks, all of them. Again pay special attention to the ones you never use or just leave plugged in all the time, like the speaker jack in a combo amp.

The same thing applies to tube sockets. Partially pull each tube and push it back in two or three or four times. Careful with the big ones, you don't want to break the index pin, so be gentle. Just partially pull and re-insert each one.

For something like a mixing console this could take awhile. But if you don't do it, you will pay someone else to do it and that someone will charge between $50 and $125 an hour. Your call. This will prevent most of the problems that repair techs see in older equipment.

Summary.

Keeping your amp in clean, dry air helps. But that isn't where most of the gigs are. Wipe down the plugs on your cables before or after using them.

Exercising all of the jacks, pots, switches, every control on the front and back panel will prevent problems. Idleness does more harm than wear, so at least once a year run everything through its paces.

I'll be back next time with how to cure the problems that exercise alone doesn't fix.

Wednesday, June 30, 2010

Stuff on eBay

So my buddy sez, "ya gotta put your stuff on eBay."

But I don't like eBay. Not for new products. I dislike the atmosphere. You see more willful ignorance on the part of the sellers than in an entire Gucci of Defense Attorneys. "I don't know much about this so I couldn't test it, but I know these are real collector items." You see old electronics with the power cord cut off, the fuse holder missing, a piece of tape over the power switch with a skull and cross bones drawn in Sharpie over it and the guy goes "it probably just needs a simple repair."

Anyway, that's not fair and just because there's losers and thieves down the road doesn't mean that there isn't plenty of decent stuff and honest sellers. I will still not sell "My" pedals there. But I have got a ton of odds and ends, leftovers, uncollected repairs, oddball parts. It's gotta go somewhere and I'm not interested in cataloging and inventorying everything. So onto eBay they go. There's a link to whatever is current on the left and I'll keep moving stuff until I can make room in the shop and music room.

For today, there's a cute little Green Ringer Clone. It's the tiny little thing you see in my post about rehousings. I made a couple and here's the extra one.

Saturday, June 26, 2010

Update from the Bench


Things have been quiet on the blog here lately. Pedal and amp repairs are the priority, I don't get to play when I've got someone's gear setting there on my bench eager to go home and make music.

Tbe Big Bad Buffer with no name is coming along nicely. The design has made it off the breadboard and the prototype PCB layout is coming together. I still need a name for it, was thinking "Diesel Drive" but still looking for ideas. This is a fun project for me since it is one of the few where the published specifications are meaningful to the design. Most of the time with pedals we are torturing and abusing the technology to create interesting sounds. This is one of the few cases where we really want things like low distortion and huge, clean headroom.

On the back burner are the parts and drawings for my recreation of the legendary Roland AP-7 Jet Phaser. If you remember the Isley Brother's song Who's That Lady, you know the sound. It's a combination eight stage (yes, 8 stages, like double Phase 90s) phase shifter with an integrated distortion circuit (the "Jet" part of the name) to push it into a completely new range of sound. This is a remarkably complex device that has never been reissued or reproduced since back in the day. This is one of those things that I wanted and couldn't afford when I was a kid and for the collectors price they sell for now, well it's time for my clone. Here's another example of what this pedal can do by the great Larry Graham and a great wrap up to this post:

Wednesday, June 16, 2010

Fancy Cables

This is a fairly hot subject and I've gotten into some ill-advised arguments over it in some forums. The arguing part seems unnecessary and I'm going to try to explain my opinion clearly and in a way that avoids stepping on anybody's toes.

A solid basic guitar cable made of reliable, quiet and relatively low-capacitance cable with reliable, high-quality plugs can be had for about $30 from any number of sources. This is all you need. Look for cable with Mogami or Canare wire and Neutrik or Switchcraft plugs. There are other brands, but these are the standard. And again, this is what you need, quiet, reliable, low-capacitance. Without that basic functionality a cable is not worth considering.

You can pay more and get additional features if you like, pretty jackets that do actually help protect the cable and gold plated ends are both popular and pretty. No reason to not have them if you like. But look at these as optional features that are added to what is essential; quiet, reliable, low-capacitance. If a cable lacks those things there is no added feature that will make up for it.

There are "premium" cables out there that are objectively, measurably, statistically and factually inferior in reliability. Some have terrible failure rates and a few have terrible failure modes.

Quick example that hit my bench, a customer using one "premium" cable had the tip of the plug come off inside the jack of his amp. Being a PCB mounted TRS Cliff jack there was no way to remove the tip without destroying and/or replacing the jack. The customer ended up with a repair because of this inferior cable with inferior plugs that had been sold to him for five times the cost of a cable that would never have had this problem. Sure the "lifetime" warranty of the cable got him a brand new one, just like the old one, but it sure didn't pay his repair bill or make up for the time without his amp.

This is unacceptable.

I don't want to hear the argument that these cables sound better - broke cables do not sound good. This industry has had reliable cables for about 30 years now. If someone presents a cable as being an improvement it must do everything those cables did, plus. Not instead.

That is all. Make sure that you are getting something that will get the job done. Then, if you can afford it and it sounds good to you upgrade however much you like. Just don't get suckered into thinking that because something is more expensive that it is automatically better. It has the potential to be better, but not all of them are.

That $30 cable I was talking about is better than what you heard on your favorite albums of the past. It really, really is good enough. And if someone wants you to pay more insist that he give you everything that you get in the low priced cable plus whatever added features he's advertising. There is no excuse for accepting less.

There are a lot of guys out there building fine cables at all price points. These are good guys selling a legitimate product. I am not criticizing them for offering something better and more expensive. On the other hand there are companies with nothing but a huge endorsement / advertising budget who sell unreliable gold-plated crap. You deserve better than that.

Friday, June 11, 2010

Rehousing Pedals, When I Do It, When I Don't


Almost every pedal builder does this at some point. Take a commercial pedal built in a cheesy, oversized enclosure with poor quality controls and jacks and rebuild it with boutique grade components. Usually smaller, but almost always more robust and reliable. Very often the electronic switching and buffering circuits are bypassed or removed as well and the pedal is recreated in a true bypass version.

I've done a few myself and have developed some opinions on the subject. Imagine that, me, with opinions. My experience has been that for simpler, analog pedals the player is better served to have a reproduction built or buying an original. Here's my breakdown on that. A decent rehouse will cost somewhere upward of $75. That plus the cost of the original pedal will cost very nearly as much as simply having most reproductions built. If we take something simple like the Dano French Toast, the cost of a pedal plus the rehouse is about the same as a clone of the Foxx Tone Machine of which it is a copy. And a Transparent OverDrive rehouse is outright silly (and borderline accessory to intellectual property theft) you can just order a Timmy for that money.

Yes, you can find a hobby guy who is just happy to have someone pay for the parts he experiments with. And that is definitely a good thing. Enjoy this hobby. That's what it is for, having fun. But, if you need a professional build quality, or if that pedal breaks down, as all things will, the pro build is going to be far better.

Some rehouses make more sense. Things like the Dano Chicken Salad, that are more complex give the player an option that he might not otherwise have. While a commercial Univibe clone like the MojoVibe (a personal favorite) would be better, it will be about twice the price of the rehouse. So it does let you get your Vibe on at a lower cost than a boutique clone, and sounds better and runs more reliably than the factory pedal.

Here's an example of not rehousing. A friend and regular customer called and asked about having me rehouse a Green Ringer into a foot-toy format for him. Instead, I suggested a scratch build that included some improvements and a much smaller footprint than could ever be possible with a rehouse.


No indicator LED. Thought about it, but things are a bit tight in there and there's never a question whether this little screamer is on. Oh, and this cost the same as just a rehouse.


On the Drawing Board - The Buffer

Got a couple of projects in the works I'd like to talk about a bit.

First, is the new buffer. This is actually a triple buffer designed to go onto a pedal board and fill all the buffer / driver / splitter needs anyone might normally have. The basic idea is, guitar goes in, there's a separate, isolated output for the tuner. This keeps the tuner off the signal path, some tuners are tone suck disasters, even when used in a branch off the signal path. This fixes that problem. There's a buffered output to the pedals, and a return. Then another buffer to drive the line to the amp.

Here's the jacks:
Guitar input
Tuner Out
Buffered Out to pedalboard.
Return from pedalboard.
Buffered Out to amp.
The stomp switch can be internally selected to either mute for tuning or bypass the pedalboard.

Technologically, this thing is a monster. It runs well on 9VDC, and even better at 18, and is safe anywhere up to 24 Volts. It uses some very serious modern IC technology instead of the usual buffers and antique opamps you see in other pedals. The dedicated Tuner Out uses a typical FET buffer stage since we don't really care what the tuner sounds like, we just want to isolate it from the rest of the signal path. Truth be told, you could run the Tuner Out into an amp or pedal and it wouldn't sound any worse than the other buffers on the market.

The design challenge now is developing this pedal to the point that we retain all the features in a compact format. Yes, this all fits in a standard "MXR" type box. And, I'm trying to keep the price under $100! as low as possible, right now we're looking at $129. There are other pedals with similar features, they are larger and vastly more expensive. Oh, except none of them give you the option of having a mute or bypass switch.

Wednesday, June 9, 2010

Raw Vintage Strat Spring Review

I recently read about some Strat springs that are allegedly designed according to the ancient specs, sold by a company called Raw Vintage. They claim awesome tonefulness, the springs are larger diameter as God and Leo intended and yadda yadda.

What got my attention is that they advertised them as being less stiff than the common, modern springs. My Warmoth / Squier mutant with 10-46 strings on an American Standard bridge took two standard springs and even then they were so stiff that when I loosened the claw enough to get the bridge level the springs would stack limiting lift on the bar. I tried every spring I could get my hands on; cheap Asian knock-offs, various Fender products, nothing really balanced well.

The Raw Vintage springs are indeed much softer than the others. I used four to replace the two with only a minor tweak of the claw and the arm is far more supple and much, much more effective for subtle effects. It is well enough balanced that I can dive bomb and come back to tune as well as could possibly be hoped (locking sperzels and a clean nut help) excellent tuning stability. Oh, and now I can pull up some, Hooray! In vibrato function these are brilliant; from slight wavers to slams the bar works much better than ever before and is much easier to modulate.

As for tone, I'm still a bit skeptical. I'm inclined to feel that the guitar now has more chime unplugged and plugged, but since I wasn't looking for that I wasn't paying enough attention before I made the change to give a fair comparison. If I had expected it, I would have listened close before or done a recording for a before and after demonstration.

I may yet do a tone test on these, it doesn't take much time to swap springs. They clearly don't hurt the sound and the improvement in trem action is so great that is reason enough to keep them. Oh and they're $20 for a set. Other than your first setup and intonation job, this is the biggest bang for the buck I've ever seen in guitar function. No, I do not sell these. Yes, I am considering it. Let me know if you aren't finding them at a price you like and I'll see what I can do.

Regardless, they are highly recommended. If you EVER use the bar, you want these. Even if you have a six-screw bridge, set to rest on the body with five springs you want the bar to come down with a reasonable effort, enough spring to come back solidly, but still relaxed enough that you can modulate the arm. These will help. Yeah, I'm a fan.

Bottom Line: 5 star improvement in Vibrato bar function. Jury still out gathering evidence on tone.

Tuesday, June 8, 2010

Pedal Repair

Among the goods and services I offer is mail-in effects pedal repair. People often feel a bit odd sending their stuff off in the mail so the clearer everybody is about how it all works the better. Like Ben Franklin said there is no contract that a crook won't break, the purpose of a contract is so that honest people can avoid misunderstanding. So this is just trying to make sure that everything is covered and you know what to expect.

Typical effect pedal repairs are done for a flat rate of $50, $55 (shipping has gone up) payable on completion when the pedal is ready to be shipped back and includes parts, labor, shipping and paypal fees. This covers repair, general reconditioning and preventative maintenance. I test the pedal and correct any problems found in addition to the complaint.

If a pedal is in extremely poor condition, has suffered from corrosion or requires exotic or rare components an estimate for the actual repair costs will be prepared and sent by email. This is not common, but does happen. I haven't had to send an estimate over $100 for a pedal yet. If an estimate is declined the charge for the diagnosis, estimate and return shipping is $10.

Email me for the shipping address and phone and to let me know when you send something. When I receive the unit I'll reply to let you know it's here. You'll get another email when the pedal is either repaired or if parts need ordering. This usually takes about a week. Some parts orders can be slow and can take a few weeks. Most common parts are on-hand and ready to go. Some older pedals used components that are almost impossible to find like the SAD1024 IC. When there is a problem like that I'll keep you informed of the hunt.

Short version: Email me. Ship the broke thing. Get an email back when it's here. Get another email saying it's fixed. Paypal $55. Get your fixed, clean and healthy pedal back in the mail.

Please include your name, address, email and the problem on paper with the pedal.

Thanks for reading. I've repaired a lot of pedals over the years and am looking forward to taking care of your gear.

Sunday, June 6, 2010

Welcome to The Ronsonic Blog

Welcome to my blog.

I'm here to talk about the guitar effects and other electro-musical gear I build for my own use and for sale. We'll have ongoing descriptions of the pedals I'm producing and a few words on what's being planned. Comments will always be open and I'm eager to hear your opinions.